


作者:挖矿领袖
The Solana Agent Kit by Send AI is an open-source framework for building Solana-native autonomous agents that interact with Solana programs and off-chain APIs. These agents can fetch wallet balances, send and transfer tokens, and create new tokens—all through natural language prompts.
This is a follow-up to How to Build an AI Agent with SendAI's Solana Agent Kit. In this article, we’ll walk through how to customize the Solana Agent Kit by adding more on-chain functions like fetching a pool’s trade history.
Prerequisites
To follow along, make sure you have the following:
-
An IDE (e.g., VSCode)
-
Git installed and a GitHub account
-
Basic understanding of JavaScript or TypeScript
-
node.js with pnpm
Creating A CoinGecko API Key
We're extending the Solana Agent Kit to support more onchain endpoints from CoinGecko. You'll need a CoinGecko API key for testing, but it's not required for the final implementation.
To obtain a CoinGecko API key, head over to the Developer’s Dashboard and click on +Add New Key in the top right corner. For detailed instructions on generating and setting up your key, refer to this guide.

Installing node and pnpm
We use pnpm specifically because the Solana Agent Kit manages its packages with it, ensuring compatibility and consistency across the project. To install node.js with pnpm, use the following command:
How function calling works
Before jumping into the code, let's explore the core concept behind AI agents.
The Solana Agent Kit is connected to large language models (LLMs) like OpenAI and Perplexity. These models support a feature called function calling, which allows the AI to suggest when certain tools or functions should be used based on the prompt or task it’s working on.
However, the AI doesn’t actually execute the function itself. Instead, it returns a structured response that includes the function name it wants to use and the arguments it believes should be passed in. It’s up to the Agent Kit to interpret this response and manually call the appropriate function using those arguments.
For example, if the AI is asked, “What’s the current price of Ethereum?”, it may return something like this:
The Solana Agent Kit interprets this response, executes the corresponding function, and passes the result back to the language model. This process enables the model to generate accurate, context-aware responses for the user.
Under the hood, this is orchestrated using LangChain, which streamlines the entire agent workflow. LangChain handles the parsing of tool calls, the routing to the appropriate function or tool, and the seamless handoff of results back to the LLM—abstracting away much of the complexity involved in chaining model outputs with external logic.
The actions are defined in a JSON specification, which acts as the menu of available functions the model can choose from. If a tool isn’t included in the JSON spec, the agent won’t know it exists and won’t try to use it.
So, when we talk about customizing the Agent Kit, we’re really talking about two things:
-
Defining new tools in the JSON spec, so the agent becomes aware of them.
-
Creating the actual handler functions that get triggered when the agent interprets the tool response.
Cloning the Solana Agent Kit
To get started, head over to the Solana Agent Kit GitHub repository and click the green <> Code button to copy the repository URL.
Then, open your terminal or command prompt and run git clone
Navigating the File System
As per SendAI’s documentation, tool extensions live under src/tools/
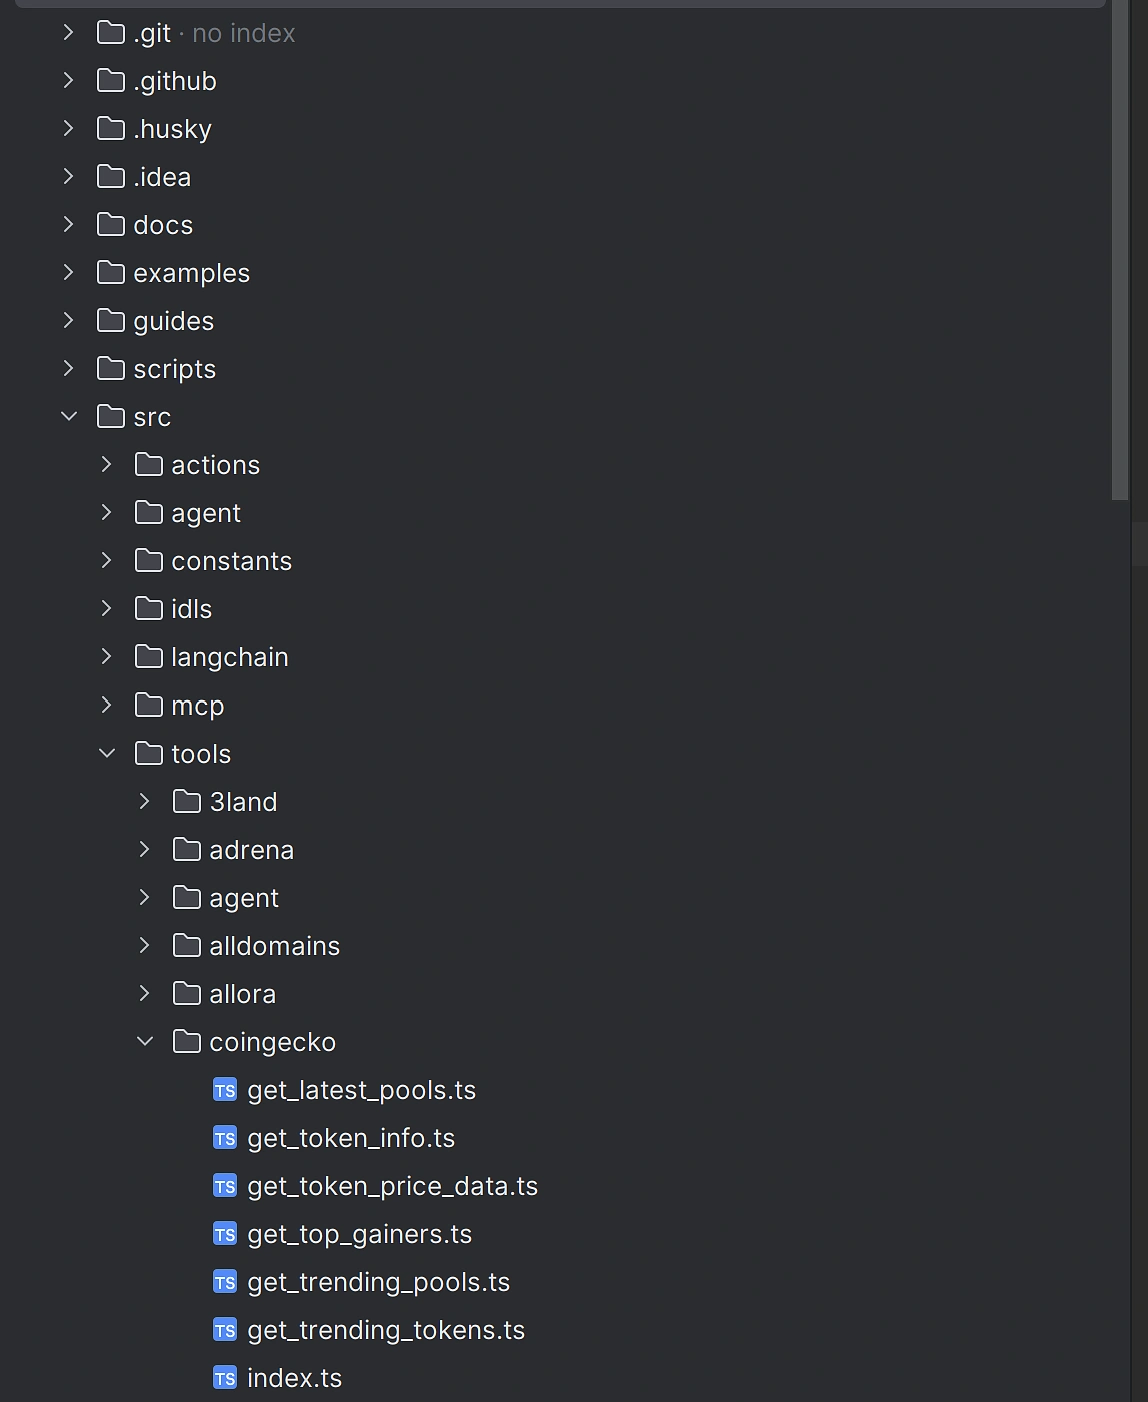
Expanding the Agent Kit
Since we’re looking to add more CoinGecko functions, we’ll start by creating a new file under src/tools/coingecko. However, if you're adding support for a new protocol that doesn't yet exist, you'll need to create a new directory for it.
We’ll start by defining a method that will fetch our external data.
Fetching External Data
Looking at the filesystem, we can see that the Agent Kit can fetch the latest or trending pools, but it currently lacks a method to retrieve a pool’s trade history. Let’s explore how to add this functionality.
Under src/tools/coingecko create a new file called get_latest_trades_by_pool.ts. Inside, let’s implement a method that fetches and returns the data for us. We’ll need to pass the SolanaAgentKit instance and poolAddress as arguments.
Next, we need to define an export for this method in src/tools/coingecko/index.ts:
Making the method available for the Agent
Once it’s exported, you can define a method for the SolanaAgentKit class in src/agent/index.ts.
This file contains all the available functions the agent can interact with and is quite large, so it’s best to locate the section where other methods for your specific protocol are defined and add your method there.
This helps keep the code organised, and if your implementation is solid, you could even open a pull request to the Solana Agent Kit repository to have it included in the official codebase.
Since we only need to return the data, we can simply return the output of the function we defined earlier — but you're free to perform any additional actions within this function if needed.
Defining the Tool
Now that the Agent Kit has a method for retrieving the latest trades for any Solana pool, the next step is to make this functionality available to the language model. We do this by defining a Langchain Tool.
The Tool acts as a bridge between the language model and our method. It tells the model what the tool is called, what it does, what kind of input it expects (in this case, a pool address as a string), and what kind of output it returns. It also includes the actual function call that runs under the hood when the model chooses to use it.
This is important because the model can’t automatically know which tools are available or how to use them—it needs clear instructions. By defining the tool, we’re giving it a structured and safe way to access external data, like the latest trades on a liquidity pool.
We’ll do this by extending the Langchain Tool class in src/langchain/coingecko/get_latest_trades_by_pool.ts. You may need to create the Coingecko directory and the Typescript file.
As before, we need to export this from the protocol’s index.ts file. At the time of writing, there is no CoinGecko directory or index.ts file under src/langchain so go ahead and create those.
Inside index.ts, export your extended class like so:
Defining the Action
Once the tool is exposed to the model, we also need to define how the agent system internally handles this functionality. This is where the Action comes in.
An Action is a formal definition of the task, including:
-
A name and description for the task
-
Example inputs and outputs to help guide usage
-
Similes (natural language variations) that help map different phrasings to this specific action
-
A validation schema to ensure the input is correctly formatted
-
A handler function that actually performs the logic using the Agent Kit
This step is about making the system more robust and flexible. While the Tool tells the LLM how to use the method, the Action tells the agent when and why to use it, and ensures everything works smoothly behind the scenes.
By setting up both the Tool and the Action, we’re enabling both the language model and the underlying agent infrastructure to collaborate and respond intelligently to user queries.
Let’s define a new action under src/actions/coingecko/getCoingeckoLatestTradesByPool.ts. Note that you will need to create the Typescript file.
Once we've defined the action for our new method, we need to make it available to the rest of the system with actions/index.ts. This file acts as a central registry for all the available actions the agent can perform.
By exporting our action here, we're essentially telling the agent:
"Hey, there's a new thing you can do, and here's how to find it."
In practical terms, it looks like this:
Testing the functionality
To test your implementation, create a .env file at the root of your project and provide the necessary credentials.
Next, install the project dependencies using pnpm (pnpm install - note that npm will not work). After that, build the project with pnpm run build.
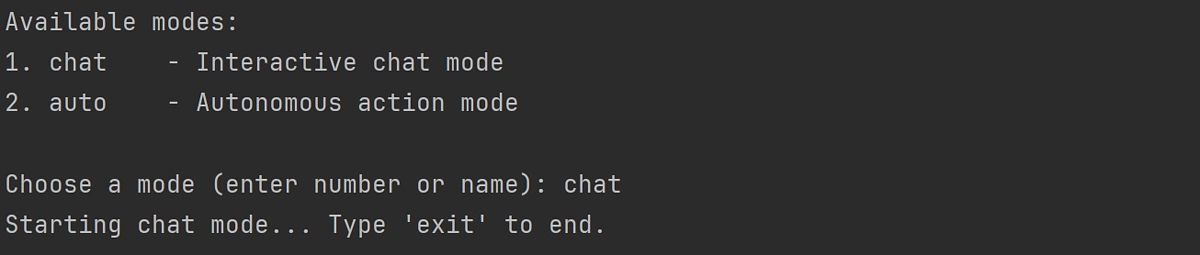
Finally, to run the application, execute the test command with pnpm run test. This will run your local version of the Solana Agent Kit, in chat or automated mode, depending on your selection.
You should now be able to prompt the agent and use natural language to perform programmatic actions on Solana, including the custom features that you have added.
Considerations
When working with the Solana Agent Kit, it's important to keep the following considerations in mind to ensure smooth operation and minimize potential issues:
- LLMs (Large Language Models) can hallucinate data and parameters: it's important to remember that LLMs can sometimes generate incorrect or fabricated data, often referred to as hallucinations. This may include hallucinating arguments or parameters that functions do not accept, resulting in an error. Better models are more likely to understand how to deal with a user request. By default, the Agent Kit will run using OpenAI's 4o-mini, but this can be adjusted under test/index.ts
-
The agent may call the wrong function: models sometimes struggle to determine which function to call for a given task. This could lead to the wrong function being invoked, resulting in failed operations or unintended behaviors. It's good to keep an eye on the logs to identify if the agent is attempting to call functions incorrectly.
-
Action descriptions may not be clear enough for the agent: The agent relies heavily on the clarity of the action descriptions provided. If the descriptions are vague or unclear, the agent may fail to understand the intended task. In some cases, the agent might not execute as expected. You may need to experiment with different phrasings or descriptions to achieve better results. Refining the descriptions and iterating on them can help guide the agent toward more accurate outputs.
-
The Solana Agent Kit and LLMs in general are new, experimental technologies, which means there may be bugs, unexpected behaviors, or limitations that have yet to be discovered. It's advised to avoid connecting the agent to your main wallet or any live production environment until you're confident in its stability. This will help mitigate the risk of potential losses or issues arising from the use of an untested tool.
If you enjoyed this article, be sure to check out this one on How to Build a Simple AI Model for Crypto Price Prediction

No Comments